
What if I could do things with a swing of a wand? Practically impossible but with technology maybe not. In this tutorial, we will use a raspberry pi and OpenCV to try and recreate something similar to a wand. It will perform specific functions when it recognizes certain symbols made by moving figures.
Content
Hardware
The hardware components that we will be using is raspberry pi and a camera v2 module. Use a suitable camera and fix it in the CSI port of the raspberry pi. Fix the position of the camera to a rigid body to capture a video without movement.

Refer the following link to better understand the working: https://iot4beginners.com/live-video-streaming-using-raspberry-pi/
Computer Vision
Computer Vision deals with the understanding, and comprehension of digital images. It is a field of science that deals with replicating the complexity of human vision with various algorithms and sensors. Python being an active community has a very commonly used computer vision library called OpenCV. We will use this library and a concept called optical flow to code this section.
1. Optical Flow
Optical flow is the apparent movement of objects in a certain scene from an observer’s point of view. It can be used to describe the movement of objects between two frames of a video. It provides a movement vector that shows the direction of flow(i.e. the path that the object covered between the frames). This concept is one way of implementing our project. It is used since it is not object-specific as it detects movements, not objects.

2. Code
Install python’s computer vision library, OpenCV in your system.
pip3 install opencv-python
Import the following libraries in a new python file:
import cv2
import numpy as np
Now declare some variables needed to guide the program:
x, y, k = 200, 200, -1

stp = 0

old_pts = np.array([[x, y]], dtype=np.float32).reshape(-1, 1, 2)
Start the video, preprocess an initial frame and then continue to the main loop. This frame acts as a refernce for considering the movement of objects.
cap = cv2.VideoCapture(0)

ret, frame = cap.read()
gray_frame = cv2.cvtColor(frame, cv2.COLOR_BGR2GRAY)

mask = np.ones_like(frame)
time.sleep(3)
Define the main loop of the program that takes a new frame every iteration. The processing is similar to the first and the output is passed to the optical flow function. This function returns a new set of points through which a line can be drawn showing the direction of movement. The number of moving points can be manually limited in the function itself.
while True:
    check, new_frame = cap.read()
    new_frame = cv2.flip(new_frame, 1)

    cv2.imshow("gray", new_gray)
    new_pts, status, err = cv2.calcOpticalFlowPyrLK(gray_frame, new_gray, old_pts, None, maxLevel=1, criteria=(cv2.TERM_CRITERIA_EPS | cv2.TERM_CRITERIA_COUNT, 15, 0.08))

    for i, j in zip(old_pts, new_pts):
        x, y = j.ravel()
        a, b = i.ravel()
        if stp == 0:
            mask = cv2.line(mask, (a, b), (x, y), (255, 255, 255), 6)

        cv2.circle(new_frame, (x, y), 6, (0, 255, 0), -1)

    new_frame = cv2.addWeighted(mask, 0.3, new_frame, 0.7, 0)
    new_frame = cv2.rectangle(new_frame, (0,0), (50, 50), (127, 255, 127), -1)

    cv2.imshow("Result Window", mask)
    cv2.imwrite("frame1.jpg", mask)

    gray_frame = new_gray.copy()

    old_pts = new_pts.reshape(-1, 1, 2)
    key = cv2.waitKey(1)
    if key == 27:
        break

cv2.destroyAllWindows()
cap.release()
- Line 6 uses the optical flow function of OpenCV
- The loop in Line 8 defined the continuous white line that is seen.
- Line 16 uses the black mask and the frame to create a weighted one which is slightly transparent.

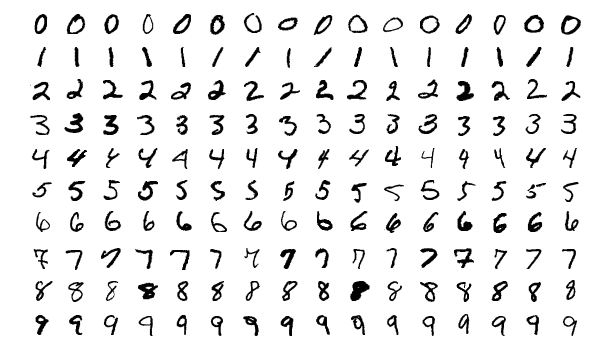
MNSIT Classifier
We will use the MNIST handwritten dataset to classify the numbers. It is a famous dataset and is easy to handle. It has a state of the art validation accuracy of almost 100%. The user can draw numbers in the air which the trained classifier can recognize.
Install the folowing libraries in your system. The dataset itself can be loaded directly from the library.
pip3 install tensorflow==2.2
1. Model
The model required for MNIST is quite simple. We will use the lastest version of Tensorflow library to code the model. Start by importing the library and other packages.
from tensorflow.keras.models import Sequential
from tensorflow.keras.layers import Dense, Conv2D, MaxPool2D, Flatten, Reshape
Now define the model:
model=Sequential()
model.add(Reshape((28,28,1), input_shape=(28*28,)))
model.add(Conv2D(filters= 32, kernel_size=3, strides=1, padding='same', activation='relu'))
model.add(MaxPool2D())
model.add(Conv2D(filters= 64, kernel_size=3, strides=1, padding='same', activation='relu'))
model.add(MaxPool2D())
model.add(Conv2D(filters= 128, kernel_size=3, strides=1, padding='same', activation='relu'))
model.add(MaxPool2D())
model.add(Flatten())
model.add(Dense(1024, activation='relu'))
model.add(Dense(10, activation='softmax'))
model.compile(optimizer='adam', loss='mse', metrics=['accuracy'])

2. Prediction
The trained model used to predict the output needed. It takes an image of size 28×28 as input and returns an array of probability values as output. The index containing the maximum probability value is the required output. Create a new python file to predict the integer value.
import tensorflow as tf
from tensorflow.keras.models import load_model
import cv2
import numpy as np
Now if you have a GPU in your system use the following command for the code to use it.
config=tf.compat.v1.ConfigProto()
config.gpu_options.allow_growth=True
session=tf.compat.v1.InteractiveSession(config=config)
Declare a new function to take an image input and return the highest probability with its index value.
def predict(im):

    model = load_model("cnn.h5")

    im = cv2.cvtColor(im, cv2.COLOR_BGR2GRAY)
    im = cv2.resize(im, (28,28))
    im = np.reshape(im, (1,28*28))

    prediction = model.predict(im)

    num = np.argmax(prediction)
    prob = prediction[0][num]

    return num, prob
- Line 3 is loads the trained model.
- The model takes gray flattened images of size 28×28 as input. Line 5-7 performs the following preprocessing.

Commands
Each number drawn should relate to a specific command. For this tutorial, the commands will be simple Computer Vision filters and functions. This is just to show the proof of concept but application-specific commands can easily be added.
COMMAND 1: If the window has colors within the specific range they turn white, and rest black. This process is also called Thresholding.
lower_red = np.array([30,150,50])
upper_red = np.array([255,255,180])

# To be added in the loop
hsv = cv2.cvtColor(frame, cv2.COLOR_BGR2HSV)
mask = cv2.inRange(hsv, lower_red, upper_red)

COMMAND 2 : If command 2 shows the edges in the video. This is done using Canny Edge Detection.
# To be added in the loop
edges = cv2.Canny(new_frame,100,200)

cv2.imshow("COMMAND 2", edges)

Output
After one is completly drawn, the window starts showing the edges. The numbering of the commands can be done as per wish.
With this, we come to the end of this tutorial. I hope you learned something new about OpenCV, its filters, and Optical Flow. Some of the concepts might get confusing so if you come across any errors or doubts comment below. The whole code and original working directory is present in this GitHub Repository: https://github.com/Shaashwat05/Magic_wand


