How to use Ultrasonic Sensor with Arduino?

by Mar 21, 2020arduino uno projects

Introduction

Ultrasonic sensors work by emitting sound waves at a frequency too high for humans to hear. They then wait for the sound to be reflected back, calculating distance based on the time required.  Since ultrasonic waves can reflect off a glass or liquid surface and return to the sensor head, even transparent targets can be detected.

Pin-out

Items Required

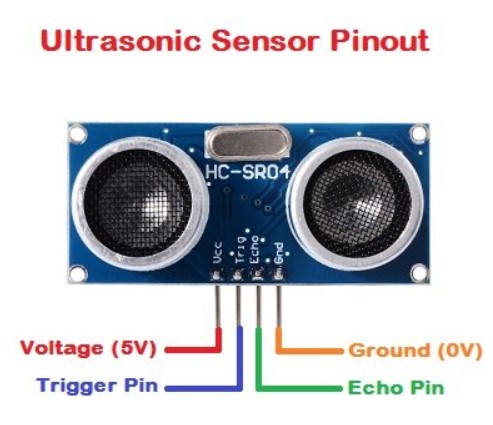
Circuit: Ultrasonic sensor

The HC-SR04 sensor has four pins, VCC, GND, Trig and Echo. Connect the VCC pin to the 5V pin of the board and the GND to the ground. After this, connect the Echo pin to D10 and the Trig pin to D9.

Sketch

First of all you need to define some variables for your project. No library is required to use the Ultrasonic sensor. In the setup() area, define the pin-mode and then begin the serial communication. Since we need to display the value which the sensor senses, so we print that in our serial monitor. The transmitter (trig pin) sends a signal: a high-frequency sound. When the signal finds an object, it is reflected and the transmitter (echo pin) receives it.

const int trigPin = 9;
const int echoPin = 10;
// defines variables
long duration;
int distance;


void setup()
{  
    pinMode(trigPin, OUTPUT); // Sets the trigPin as an Output
    pinMode(echoPin, INPUT); // Sets the echoPin as an Input
    Serial.begin(9600); // Starts the serial communication
}

void loop() {
// Clears the trigPin

digitalWrite(trigPin, LOW);
delayMicroseconds(2);


// Sets the trigPin on HIGH state for 10 micro seconds
digitalWrite(trigPin, HIGH);
delayMicroseconds(10);
digitalWrite(trigPin, LOW);
// Reads the echoPin, returns the sound wave travel time in microseconds
duration = pulseIn(echoPin, HIGH);

 
// Calculating the distance
distance= duration*0.034/2;
// Prints the distance on the Serial Monitor
Serial.print("Distance: ");
Serial.println(distance);
}

Here are some snaps from my actual project.

Creating a multiplication Skill in Alexa using python

Written By Anmol Punetha

Hey, I am Anmol. I am a tech blogger and an electronics engineering student at the same time. As you're reading my blog, you are getting a generous amount of information in simpler words. Hope it's of use. Thank you for visiting. Keep reading!

RELATED POSTS

DIY project: Using RGB LED with Blynk

DIY project: Using RGB LED with Blynk

We already have talked about using Blynk with Arduino. In this tutorial, we will make a DIY project using RGB LED with Blynk. We will also control the intensity of it using some special widgets in Blynk. Contents: RGB LED with Blynk IntroductionMaterials...

Using a Seven Segment Display with Arduino

Using a Seven Segment Display with Arduino

Let's learn how to configure a SSD (Seven segment display) with Arduino. You will also learn to make the counter using a single SSD. Contents: IntroductionMaterials RequiredCircuitArduino CodeCode Explanation 1. Introduction The Seven Segment Display has basically 10...

Using Stepper motors with Arduino

In this tutorial, you will learn to configure the stepper motors with the Arduino Uno. https://iot4beginners.com/arduino-uno-a-basic-introduction/ Contents: IntroductionMaterials requiredHardware ExplanationThe circuitArduino CodeA DIY Project's idea 1. Introduction...

DIY Project: Arduino controlled Bluetooth Car

DIY Project: Arduino controlled Bluetooth Car

Let's make a wireless Arduino Controlled Bluetooth car. Contents: IntroductionMaterials RequiredIntegrating the Chassis kitArduino CodeThe Circuit and it's ExplanationConfiguring the Mobile ApplicationThe Final Run 1. Introduction Hey everyone, today we are going to...

How to use a Servo motor with Arduino?

How to use a Servo motor with Arduino?

Introduction A Servo Motor is a small device that has an output shaft. This shaft can be positioned to specific angular positions by sending the servo a coded signal. As long as the coded signal exists on the input line, the servo will maintain the angular position of...

Using IR sensor with Arduino Uno

Using IR sensor with Arduino Uno

Introduction An  IR (Infrared sensor)is an electronic device, that emits in order to sense some aspects of the surroundings. An IR sensor can measure the heat of an object as well as detects the motion. The emitter is simply an IR LED( Light Emitting Diode) and...

Blinking a LED using Arduino Uno

Blinking a LED using Arduino Uno

Blinking a LED is the most basic project in the Arduino. You basically make some easy connections, write the code and upload it in the Arduino. With that, you can control the blinking rate, the duration for which it was glowing and lot more. To know how to install the...

VIDEOS – FOLLOW US ON YOUTUBE

EXPLORE OUR IOT PROJECTS

IoT Smart Gardening System – ESP8266, MQTT, Adafruit IO

Gardening is always a very calming pastime. However, our gardens' plants may not always receive the care they require due to our active lifestyles. What if we could remotely keep an eye on their health and provide them with the attention they require? In this article,...

How to Simulate IoT projects using Cisco Packet Tracer

In this tutorial, let's learn how to simulate the IoT project using the Cisco packet tracer. As an example, we shall build a simple Home Automation project to control and monitor devices. Introduction Firstly, let's quickly look at the overview of the software. Packet...

All you need to know about integrating NodeMCU with Ubidots over MQTT

In this tutorial, let's discuss Integrating NodeMCU and Ubidots IoT platform. As an illustration, we shall interface the DHT11 sensor to monitor temperature and Humidity. Additionally, an led bulb is controlled using the dashboard. Besides, the implementation will be...

All you need to know about integrating NodeMCU with Ubidots over Https

In this tutorial, let's discuss Integrating NodeMCU and Ubidots IoT platform. As an illustration, we shall interface the DHT11 sensor to monitor temperature and Humidity. Additionally, an led bulb is controlled using the dashboard. Besides, the implementation will be...

How to design a Wireless Blind Stick using nRF24L01 Module?

Introduction Let's learn to design a low-cost wireless blind stick using the nRF24L01 transceiver module. So the complete project is divided into the transmitter part and receiver part. Thus, the Transmitter part consists of an Arduino Nano microcontroller, ultrasonic...

Sending Temperature data to ThingSpeak Cloud and Visualize

In this article, we are going to learn “How to send temperature data to ThingSpeak Cloud?”. We can then visualize the temperature data uploaded to ThingSpeak Cloud anywhere in the world. But "What is ThingSpeak?” ThingSpeak is an open-source IoT platform that allows...

Amaze your friend with latest tricks of Raspberry Pi and Firebase

Introduction to our Raspberry Pi and Firebase trick Let me introduce you to the latest trick of Raspberry Pi and Firebase we'll be using to fool them. It begins with a small circuit to connect a temperature sensor and an Infrared sensor with Raspberry Pi. The circuit...

How to implement Machine Learning on IoT based Data?

Introduction The industrial scope for the convergence of the Internet of Things(IoT) and Machine learning(ML) is wide and informative. IoT renders an enormous amount of data from various sensors. On the other hand, ML opens up insight hidden in the acquired data....

Smart Display Board based on IoT and Google Firebase

Introduction In this tutorial, we are going to build a Smart Display Board based on IoT and Google Firebase by using NodeMCU8266 (or you can even use NodeMCU32) and LCD. Generally, in shops, hotels, offices, railway stations, notice/ display boards are used. They are...

Smart Gardening System – GO GREEN Project

Automation of farm activities can transform agricultural domain from being manual into a dynamic field to yield higher production with less human intervention. The project Green is developed to manage farms using modern information and communication technologies....